chicken legs with forty cloves of garlic

DSC05237.jpg

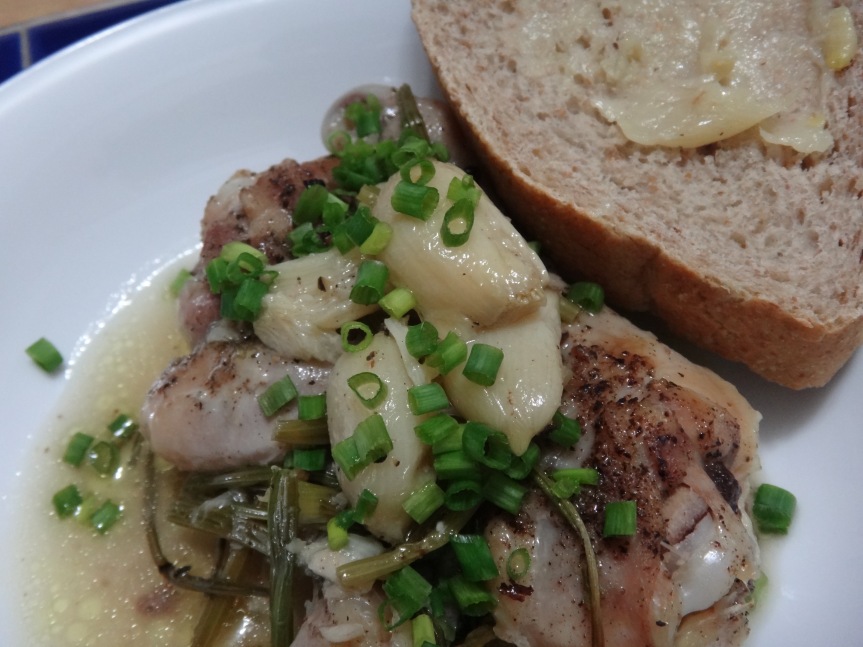
…more or less. Actually, I used 3 bulbs of garlic, the big kind called elephant ears. I adapted the recipe from one I found on Food 52 which itself was adapted from a James Beard recipe.  I cooked this chicken the way the Thais cook with cilantro, with the root. In the end, the chicken was seasoned just right, aromatic with garlic, celery, and the cilantro. We ate the drumsticks with thick slices of fresh whole wheat Farmer’s Bread that had the cooked garlic rubbed into it like a paste. You would think that the  garlic would have a pronounced flavor but it was mild compared with raw garlic.  Now you can have your garlic and enjoy it too.

Chicken with 40 Cloves of Garlic
8 whole chicken legs
1-2 teaspoons kosher salt (if using bouillon cube, reduce salt)
40 cloves garlic (3 bulbs), peeled
1 cup Chinese celery, stripped of leaves, chopped into 2 inch lengths
2 tablespoons olive oil
Freshly ground black pepper
Freshly ground nutmeg
4 sprigs cilantro with the roots, washed well
1/4 cup dry white wine
1/3 cup chicken stock made from 1/3 of a bouillon cube
Crusty bread or toast for serving

  1. Heat the oven to 375ºF. Season the chicken legs all over with the salt. To cut calories, I stripped the skin off 4 of the legs. Arrange the chicken legs in a single layer in an ovenproof baking dish with a tight-fitting lid.
  2. Scatter the garlic and celery into the gaps between the chicken pieces, and then drizzle everything with the olive oil. Grind some black pepper and a bit of nutmeg over the chicken and vegetables and arrange the parsley on top. I used cilantro with the roots still attached.
  3. Pour in the wine and the chicken stock. Cover the dish tightly with aluminum foil and put on the lid. Bake the chicken for 45 minutes to 1 hour, without removing the lid until the 45-minute mark. When the chicken is really tender, and the garlic is soft enough to spread, remove the dish from the oven.
  4. Serve the chicken in shallow bowls with plenty of the fragrant sauce; spread the softened garlic on the bread and then dunk it into the sauce as you eat your chicken~Merrill Stubbs, Food 52.

danish aebleskiver pancake balls with banana

DSC05234

Aebleskiver pronounced “able-skewer” refers to both the pancake ball and the griddle it is cooked in. The basic recipe below came with the griddle, s. The pancake balls turned out light and fluffy, not too sweet, and very addictive! You can’t have just one.

Banana Aebleskiver Pancakes (based on Great Grandma’s Danish Aebleskiver)a heavy iron pan with seven shallow cup

Basic Recipe
2 cups flour
1 teaspoon salt
1 teaspoon baking soda
2 cups sour milk (2 tablespoons white vinegar topped up to 2 cup line)
3 eggs, separated

Filling (optional)
Mashed ripe banana, about 1/3 cup

Special Equipment
Aebleskiver, a cast iron griddle
Metal Chinese soup spoon, bamboo skewers, or teaspoon

  1. Sift together flour, salt, and baking soda in a large bowl. Add sour milk and egg yolks. In another large bowl, beat egg whites until light and fluffy, until soft peaks form. Gently fold egg whites into batter. Put the batter into a small pot with a spout, e.g. a teapot; a measuring cup; or a large squeeze bottle, the kind used in commercial kitchens.
  2. Heat aebleskiver griddle on medium heat. Grease each cup with melted butter, oil, or vegetable oil cooking spray. Reduce heat to low. Then fill each cup half full. If using filling, fill the cup only half full with batter and place a small amount of fruit in each cup. Top with batter.
  3. On low heat cook for approximately 8 minutes on the first side or until golden brown on the bottom. When the top starts to look shiny and have bubbles, it’s close to time to flip. Look for the batter to pull away from the sides. It will be easier to flip when the bottom is cooked. Don’t be tempted to flip them too early for they’ll stick to the sides and tear. Flip using a metal Chinese soup spoon. This kind has a thin edge around the rim and is useful for getting under the bottom of the pancake to flip. If you don’t have a metal soup spoon, you can improvise with skewers or a teaspoon; scoop up the edges and turn. Cook the second side for 2-4 minutes or until the bottom is cooked through and slightly browned. Repeat steps 2 and 3 until all the batter is used up.
  4. When both sides are done, serve with confectioner’s sugar or cinnamon sugar for rolling the pancakes, or honey or maple syrup for dipping. Also,  try this chocolate-y Nutella thinned with milk to the desired consistency. Best eaten warm.

Cook’s Notes: I used an Oxo salad dressing mixer to pour the batter into the aebleskiver griddle. Try using a dome lid to cover the griddle during cooking. It will speed up the cooking of the pancake balls and contribute to overall browning.

Yields 35-56 pancake balls

Variation:

    • Mix chopped apple and mashed banana together with brown sugar. Yum.
Click to play this Smilebox collage
Create your own collage - Powered by Smilebox
This photo collage created with Smilebox

poached egg and grilled pork on a rice burger patty

DSC05214.jpg

We haven’t been to Somtam restaurant in months, so we went last night and brought home our leftovers:  grilled pork and sticky rice. I like these leftovers. They make a great breakfast the next day.

Heat about 2 teaspoons oil in a skillet over medium heat until it shimmers.

To make the rice burger patties, I pressed the sticky rice in the bottom of a ramekin, to make a patty about 1 inch high. If the rice is too dry, pour about a teaspoon of water on it and nuke it for about 20 seconds or until it is soft. To unmold the rice, run a sharp thin blade around the edges and shake it out upside down into the skillet with the hot oil. The rice will sizzle. Fry each patty about 3-4 minutes per side or until golden brown and crispy.

Meanwhile, crack an egg on the counter and open the egg in a clean ramekin.

To poach the egg, heat 2/3 pot of water in a small sauce pan. Add about 1 tablespoon vinegar to the water and let it boil. Turn down the heat to a simmer. Using a silicone spatula, swirl the water and slip the egg from the ramekin  into the center of the eddy. Swirl a little bit more, being careful not to break the yolk. The vinegar helps the egg yolk and egg white to combine while the swirling eddy helps to shape the cooking egg  into a round. Cook 3-4 minutes depending on how runny you want your egg yolk.

To remove the egg from the sauce pan, I use a spider. This is a spatula with a round head that has holes instead of slits. Drain the poached egg well and put it on top of the rice burger patty.

To assemble, put the  patty on a plate. Top with a piece of ham, or in this case, grilled pork, and  of course, the poached egg. Garnish with Sriracha sauce, if desired. Other garnishes: minced onion or scallion and chopped fresh cilantro.

Herbed Pan-Fried Pork Chop

Reblogged from More Than One More Day.Blogspot.com November 13, 2010.

I always like to try new recipes. This one is from America’s Test Kitchen, which seldom disappoints. It had good flavor without being either too salty or too oily. The only question I had was, what do I do with the crisp bacon bits?

Blended spices (or use your own blend)
1/2 teaspoon marjoram
1/2 teaspoon thyme
1/4 teaspoon basil
1/4 teaspoon rosemary
1/4 teaspoon sage
pinch of ground fennel seed
1/2 teaspoon salt

1 cup flour
3 strips of bacon, chopped
4 center cut, bone-in pork chops
1/4 to 1/2 cup vegetable oil

Make the spice blend. Pour blended spices in a shallow pan or pie plate. You may find you will need to make another batch after two pork chops. I did. Pour flour into another pan or pie plate.

Season the pork chops. Dip each chop in the spice blend, then lightly dredge in the flour. Let the pork chops rest in a plate for 10 minutes. Meanwhile, fry up the bacon in a large 12 inch skillet. When crisp, remove the bacon to drain but reserve the bacon fat. Start wth 1/4 cup of oil to the fat and heat until just smoking. Add more oil if necessary.

Fry the pork chops. Put each pork chop in the hot oil. Fry for 3-4 minutes on each side. Mine came out over done so I would reduce that to 2-3 minutes per side instead. Drain on a greased wire rack set over a baking tray in a warm oven. Don’t discard the pan drippings.

Still no idea what to do with the bacon bits but since I was making pan fried asparagus with tomatoes and black olives, I decided to dress that up with the bacon. Ta-dah!

Pan-fried Asparagus with Tomatoes and Black Olives (and bacon bits)
2 pounds thick asparagus spears, ends trimmed
1 pint cherry or grape tomatoes, halved
1/3 cup black olives, chopped
2 -4 garlic cloves, sliced
2 tablespoons olive oil
1 tablespoon unsalted butter
1/2 cup Parmesan cheese (optional)
1 tablespoon bacon, chopped and fried until crisp, drained (optional)
4 tablespoons fresh basil, chopped (optional)

Trim the asparagus. Hold up one spear and snap off the end. Cut all the other spears to the same length.

Make the tomato-black olive dressing. Use the pan drippings from the pork chops to make the dressing. Over medium heat, fry the garlic in the pan drippings until fragrant, about 30 seconds. Add the tomatoes and olives. Cook until the tomatoes “spring” water and become wilted. Pour the dressing into a bowl, cover with foil, and reserve.

Cook the asparagus. Rinse out the skillet and dry it with paper towels. Heat 1 tablespoon butter and 1 tablespoon oil. Lay half the spears in the pan in one direction. Lay the other half in the opposite direction. Cover and cook over medium heat until the asparagus turns a bright green, about 2-4 minutes. Remove to a serving dish and pour the dressing on top. Top with cheese, basil, or bacon bits.