cookbook review: Real Food Real Easy

I’ve been taking a couple days off from cooking because I cut my finger. (It also makes it hard to touch type!) But then I borrowed this book from the NYPL Real Food Real Easy (2010) by George Stella. It’s got low carb  recipes in it and each recipe has a “handful” of ingredients (no more than nine, actually) and an uncomplicated method–3 or 4 steps. So in the next few weeks until the book is due, I’ll be sampling recipes. Here are some interesting ones:

Table of Contents

Starters and Snacks–cabbage wrapped pot stickers sound like a winner, so does tempura asparagus

Breakfast and Brunch–how about blue coconut parfaits?

Lunchtime Favorites–I think  southwestern chicken salad in avocado bowls sounded delicious

Poultry–I want to try all of the chicken recipes, especially spinach and feta chicken breast roulades

Meats–Szechuan beef and broccoli, oh my!

Seafood–salmon with a creamy dill sauce!

Slow Cooker Cookery–ground sirloin chili wonder how hot it really is… But I’ll never know. No slow cooker!

Vegetables and Sides–spaghetti squash with ricotta blush sauce. YUM.

Wholesome Whole Grains and Legumes–quinoa pilaf!

Desserts–flourless fudge brownies? I’m dreaming…

cookbook review: Cooking Light, Eat Smart Guide: 200-Calorie

I borrowed this book from the NYPL (2011, Oxmoor House) to try the low fat-low carb recipes. All of the recipes have nutrition information and all of them are 200 calories or below per serving. What I liked about it was how simple and uncomplicated the recipes were so that the cook need never feel that eating healthy is too much of a pain. Recipes that are quick and easy are helpfully marked. Don’t just look at the calories; also check the portion size, especially if the calories seem too good to be true! For example, one dulce de leche tartlet is 180 calories–it’s a tiny, tiny thing made from a mini phyllo shell. Can you seriously eat just one and not do irreparable damage to your diet?

The table of contents is quirky, with the soups coming just before the desserts.

Appetizers, Snacks & Beverages
Entrées
Salads
Soups
Desserts

In any case, I like to adjust recipes to taste so I seldom follow them exactly. I call it, getting inspiration!  And since I like to go low salt as well, I prefer to substitute my own homemade broths and stocks for canned. The chicken-vegetable-barley soup I made last week was inspired by this cookbook. I am also inspired to bake a lemon pudding cake. But that’s for another posting!

Moroccan grilled chicken and sautéed peas with shallot and mint

I was enjoying the sunny cool weather on Broadway last Sunday afternoon when I came across a street fair on the east side of 103rd Street. At the very first table I looked at I found this George Foreman grill  marked $5.00. The lady said, oh, no, it’s more than that. She wanted ten. I figured she had bought it at another street fair for $5.00 and now she was selling it at 100% markup. The thing had never been opened and never been used. I figured $10.00 was still a steal so I bought it.

Moroccan Spiced Grilled Chicken Breasts (from Simply Recipes)
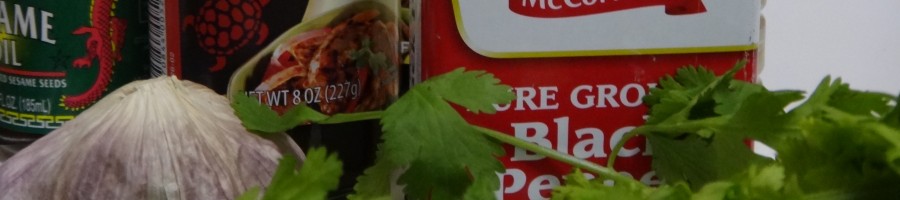
INGREDIENTS
1/2 cup plain yogurt
1/2 cup chopped fresh cilantro (or 1 1/2 teaspoons ground coriander)
1 Tbsp olive oil
2-4 cloves garlic, minced
1 1/2 teaspoons paprika
1 1/2 teaspoons ground cumin
1/2 teaspoon salt
1/2 teaspoon freshly ground black pepper
1 1/2 pounds skinless, boneless chicken breasts

METHOD
1 Mix the marinade ingredients (yogurt, cilantro, olive oil, garlic, paprika, cumin, salt, and pepper) together in a medium sized bowl. Add the chicken pieces to the bowl and thoroughly coat with the marinade. Cover with plastic wrap and chill in the refrigerator from 6 to 10 hours.
2 . Grill the chicken breasts until cooked through, about 2 1/2 to 3 minutes in the Foreman grill. Take care not to overcook, as chicken breasts can easily dry out.

Honestly, this recipe had a very light flavor. That’s probably because I only marinated the chicken for 45 minutes instead of the recommended 6-10 hours. This website didn’t give the nutrition information so I can’t begin to estimate the number of calories, fat, protein, and sodium that are in it. In the Foreman grill, I could only cook each chicken breast one at a time. I discovered that I had to wipe the grill plates once halfway through cooking the fillets because charred bits tended to stick to the chicken. The grill was slanted so that the  fats and juices ran down into the little trough that came with the grill. This bargain Foreman grill performed very well; the chicken was tender and juicy. I think I got my $10.00 worth. I’d make this again but I would marinate the chicken longer.

Sautéed Peas with Shallot and Mint (adapted from America’s Test Kitchen)
Serves 4
I made some changes to this recipe because the amount of salt in it is alarming. Two things to remember: it isn’t necessary to thaw the frozen peas first and the purpose of adding the lemon juice is to prevent the peas from turning brown. But mine did anyway.  However, the lemon imparted a light flavor that enhanced the sweetness of the peas. The mint wasn’t too strong; next time I will buy mint from Whole Foods. Their herbs tend to be fresher but more expensive.  I would make this again because the peas were firm enough to chew but not creamy soft. I liked that.

1 teaspoon olive oil
1 small shallot, minced (about 1 tablespoon) (I used red onion)
Salt (omit salt if using chicken broth)
1-2 garlic clove(s), minced
1 pound frozen baby peas (about 3 cups)
1/4 cup low-sodium chicken broth or water
1/4 teaspoon sugar (I left this out)
1/4 cup fresh mint, minced
1 tablespoon unsalted butter
2 teaspoons fresh lemon juice
Dash of Mrs. Dash’s Italian Medley (I added this to compensate for the low salt)
Pepper

  1. Heat oil in a 12-inch skillet over medium high heat until shimmering. Add the shallot and 1/8 teaspoon salt and cook until softened, about 2 minutes. Stir in the garlic and cook until fragrant, about 30 seconds.
  2. Stir in the peas, broth or water, and sugar, if using. Cover and cook until the peas are bright green and just heated through, 3-5 minutes, stirring halfway through cooking.
  3. Stir in the mint and butter until incorporated. Turn off the heat. Stir in the lemon juice. Season with salt and pepper to taste and serve.

Per serving: Cal 130; Fat 4g; Sat fat 2g; Chol 10mg; Carb 17g; Protein 7g; Fiber 5g; Sodium 110mg (will vary if you use water instead of broth)


pavlova: perfect, but not quite

It frustrates me that a meringue is not as simple as its recipe. There are just three ingredients: egg whites, cream of tartar, and sugar, but getting the proper height is the challenge. I have my theories.  The first time I tried this (Nigella’s Chocolate Raspberry Pavlova) I thought the lack of height was due to the fact I’d used packaged egg whites. Now although I am using fresh egg whites they are not rising high enough so now I think I didn’t whip them long enough to get them truly stiff.

I  heated the oven to 250˚F then I made the meringue. First I prepared a baking tray lined with parchment paper. Using an 8″ cake pan bottom as a template, I traced a circle in the middle of the paper with a black marker and turned it upside down on the tray. Then I set it aside for later.  I got together the ingredients for the meringue:

4 egg whites, separated when cold then brought to room temperature (about 30 minutes)
1/4 teaspoon cream of tartar
1 cup superfine (caster) sugar

Cake Baker’s Note: The bowl and beaters must be absolutely free of grease and there must be no yolk in the egg whites or they will not whip up.

I whipped the egg whites on medium speed until foamy. On high speed, I  added the cream of tartar and whipped the mixture until soft peaks formed. This means when I raised the beaters, the peaks flopped over. I continued whipping while adding the sugar one tablespoon at a time, until the egg whites became satiny smooth and glossy, forming stiff peaks. I was afraid to overbeat them so I stopped after a few minutes. I remember reading somewhere to beat egg whites for a meringue for at least 10 minutes. I will have to try that another time.

I scraped the meringue into a mound in the center of the circle, making the edges slightly higher than the center. Then I put it in the oven between 60 and 75 minutes (an hour and 10 minutes for me) until it formed a hardened shell that was pale cream in color. I turned off the heat and let the meringue cool in the oven with the door closed for at least 2 hours. Then I carefully removed the paper and let it finish cooling on a wire rack while I prepared  the topping:

1 half-pint heavy cream
2 tablespoons superfine sugar (optional)
1 pint raspberries (or any kind of berries, kiwi fruit, mangoes, passion fruit–whatever inspires you!)

I made the meringue according to the very helpful directions (with pictures) on How to Make Meringue. This meringue inside was intensely sweet and puffy like a marshmallow, the outside was wafer-brittle and crisp.  The “marshmallow” had height this time but there was  yet still a dome of air above it enclosed by a crisp thin shell. So when I put the whipped cream on top, the delicate shell shattered and wafer-thin shards fell on top of the marshmallow beneath. We scooped it up anyway and ate it with raspberries, crackling and all. It was delicious. Such contrast of taste and texture: intensely sweet marshmallow-y meringue, crisp wafer shell, with the light taste of cream and the tang of raspberry.

Click to play this Smilebox collage
Create your own collage - Powered by Smilebox
This free picture collage made with Smilebox